

Tips for restoring your beeswax wraps
Looking for a fun and easy way to be productive on your afternoon at home?
Well, it might be time to pull out your favourite beeswax wraps and give them the little extra tender loving care they deserve. They’re the ones with the funky pattern that you fell in love with as soon as you saw them, or the one that was given to you by your best mate for your housewarming, or the one you stole from your aunty at bad Santa last Christmas.
Your Beeswax Wraps are more than just food wraps, they are reusable items we keep close every day that say something about you. That you are making a difference towards reducing single-use plastic!
Depending on how much ‘love’ your wrap has had in the last 6 months will determine whether or not it’s in need of repair. Look for deep cracks, exposed fabric or crumbing wax. There is a good chance that despite the wear and tear, your wrap is still working fine.
Look for the wraps that leave larger residue stuck to bowls, or wax that feels dry and ready to fall off.
Now that you have you ready to be repaired wraps, it’s time to get some tools for the job:
- Clothes washing pegs
- A thin piece of bamboo/stick or string
- Hairdryer (or heat gun)
- Food tongs
Now, let’s go:
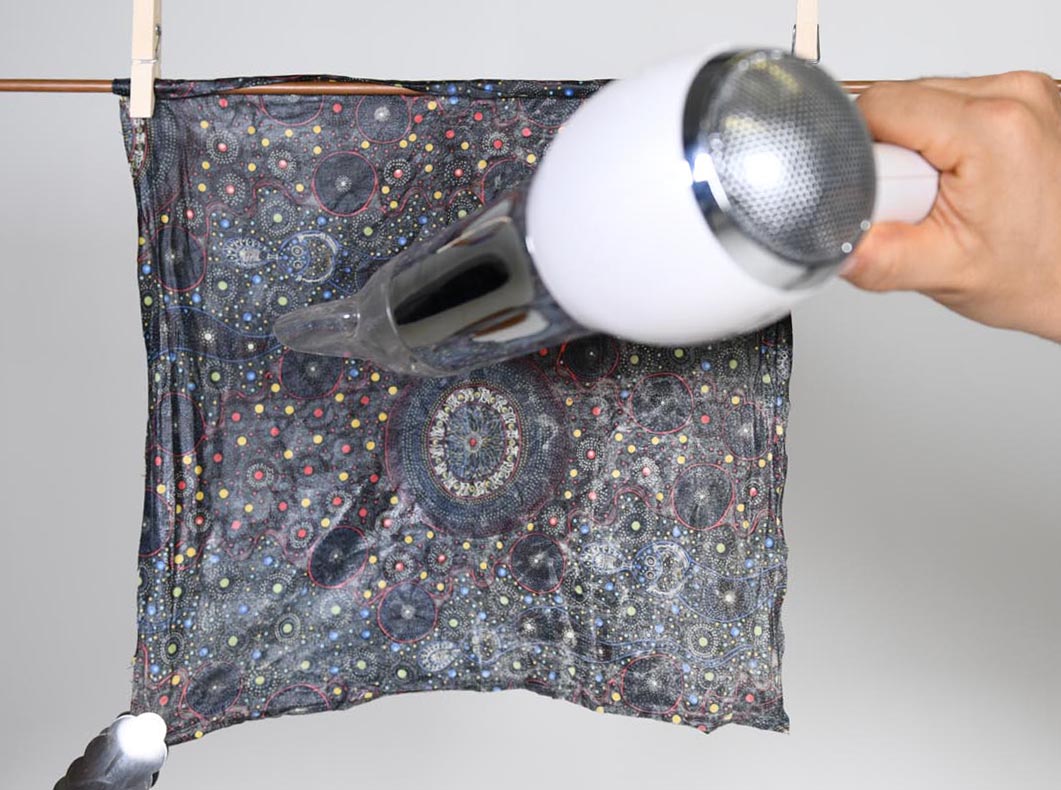
1. Find something like a thin piece of bamboo/stick or string that you can easily peg and hang your beeswax wrap onto from two corners.
2. Hold the beeswax wrap with the food tongs from a bottom corner and at a distance of about 15 to 30 cm depending on the heat output of your device. If you are using a hair dryer you will likely need to use the highest setting. For a heat gun, start on the lower setting. Begin applying hot air evenly around the wrap. Gradually move closer with the same motion covering all parts of the wrap until you see the wax slowly starting to melt.
3. Continue spreading the hot air around the surface of the entire wrap, distributing the melted wax over the areas in need of repair. You can use a spatula, warm butter knife or brush to help move the wax mixture across the surface of your wrap if needed. It is easier just to shake it evenly, and pat firmly together with your hands once the wax is cool enough to not come off on your skin.
4. Once your wrap cool down, rotate, and repeat the process until satisfied. be sure to unravel the edges and run the heat in the corners as well.
**At any stage if you can see the wax is melting too fast or the heat is causing damage to your wrap simply pull the hot air source back, let the wrap cool down for about 15 seconds and then keep going from a slightly greater distance.
Even some of the oldest and the most well-used wraps have been revived back to great condition with this technique giving them a second and even third life!
We recommend repairing your wraps as you see fit, depending on how much you use them and the condition of your wrap.
If only all of our everyday items were so easy give a second, third or even fourth life!
Good luck, and don’t forget to tag and share some pics of your restoration project on our social media platforms. @instagram.com/beeswaxwraps.com.au


